There is a good news…
In Dynamics Ax 4.0 enterprise portal every site is company specific. You can’t change company. But now in Dynamics Ax 2009 Enterprise Portal you can change company. If you have the access to see data of cross company, you can change company and see data. It is really a good feature.
Another thing is, you can write select statement in X++ using crossCompany key word.
Sunday, April 27, 2008
Wednesday, April 16, 2008
How to write a web lookup method in X++ (Dynamics Ax)
This article is for those who has basic knowledge of Dynamics Ax (Axapta).
To write this method I used Ax 3.0
Prerequisite: You should have Ax 3.0 Enterprise Portal (EP) installed and license for EP development.
1. Open your Ax application then AOT.
2. Create a new table and rename it as you wish (I used a name "WebLookUpTable") and add three fields to it as shown below:

3. Now go to Methods node of the table you just created and add a new method.
4. Rename the method "webLookUpTableTest" or as you wish. Your method now is a void type. Add "client static" before void key work.
5. Now add the following lines to your method.
client static void webLookUpTableTest()
{
webTableLookup webTableLookup;
Query query;
QueryBuildDataSource queryBuildDataSource;
;
webTableLookup = webTableLookup::newParameters(tableNum(WebLookUpTable));
webTableLookup.addLookupfield(fieldNum(WebLookUpTable, ProfileId),true);
webTableLookup.addLookupfield(fieldNum(WebLookUpTable, Name));
webTableLookup.addLookupfield(fieldNum(WebLookUpTable, Phone));
query = new Query();
queryBuildDataSource = query.addDataSource(tableNum(WebLookUpTable));
webTableLookup.parmQuery(query);
webTableLookup.run();
}
5. Browse your newly created table and create some data in the table.
6. Now your table and web lookup method is ready. You can use it on your existing web form or create a new web form to test it. I used a new web form.
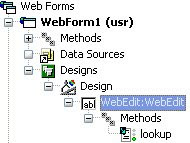
7. To create a new web form go to Web node of AOT then Web Forms. Right click on Web Forms node, on context menu click on New Web Form. Give a name to this form if you wish. Add a WebEdit control to the web form. Go to the Methods node of the WebEdit control and select then right click on it and select Override Methods then "lookup" method.
8. Double click on the lookup method and add "WebLookUpTable::webLookUpTableTest();" after super().
Your web form will look like:
9. Right click on the WebEdit control and click on Properties. Set "Custom" for LookupMethod property.
10. Create a menu item for this web form and add it to a web menus wherever you want. I added it to EPSalesHome->Common tasks->Lookup test.

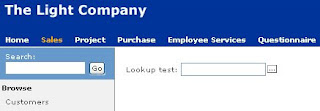
11. Save your entire customization and run your EP. Browse the web form you added and see the control on that form. A lookup button will be available on this control.
To write this method I used Ax 3.0
Prerequisite: You should have Ax 3.0 Enterprise Portal (EP) installed and license for EP development.
1. Open your Ax application then AOT.
2. Create a new table and rename it as you wish (I used a name "WebLookUpTable") and add three fields to it as shown below:

3. Now go to Methods node of the table you just created and add a new method.
4. Rename the method "webLookUpTableTest" or as you wish. Your method now is a void type. Add "client static" before void key work.
5. Now add the following lines to your method.
client static void webLookUpTableTest()
{
webTableLookup webTableLookup;
Query query;
QueryBuildDataSource queryBuildDataSource;
;
webTableLookup = webTableLookup::newParameters(tableNum(WebLookUpTable));
webTableLookup.addLookupfield(fieldNum(WebLookUpTable, ProfileId),true);
webTableLookup.addLookupfield(fieldNum(WebLookUpTable, Name));
webTableLookup.addLookupfield(fieldNum(WebLookUpTable, Phone));
query = new Query();
queryBuildDataSource = query.addDataSource(tableNum(WebLookUpTable));
webTableLookup.parmQuery(query);
webTableLookup.run();
}
5. Browse your newly created table and create some data in the table.
6. Now your table and web lookup method is ready. You can use it on your existing web form or create a new web form to test it. I used a new web form.
7. To create a new web form go to Web node of AOT then Web Forms. Right click on Web Forms node, on context menu click on New Web Form. Give a name to this form if you wish. Add a WebEdit control to the web form. Go to the Methods node of the WebEdit control and select then right click on it and select Override Methods then "lookup" method.
8. Double click on the lookup method and add "WebLookUpTable::webLookUpTableTest();" after super().
Your web form will look like:

9. Right click on the WebEdit control and click on Properties. Set "Custom" for LookupMethod property.
10. Create a menu item for this web form and add it to a web menus wherever you want. I added it to EPSalesHome->Common tasks->Lookup test.

11. Save your entire customization and run your EP. Browse the web form you added and see the control on that form. A lookup button will be available on this control.

[control on web form]

[Lookup form]
In the above lookup method, you are using "webTableLookup" class to crate lookup. The Query and QueryBuildDataSource have been used to set data data source to web lookup form.
webTableLookup.addLookupfield(fieldNum(WebLookUpTable, ProfileId),true);
In the above line true has been passed because of return value. It means the selected ProfileId to be returned to the WebEdit control.
Monday, April 14, 2008
What’s New in Microsoft Dynamics AX 2009
Hi Guys,
There are some interesting things related to Microsoft Dynamics AX 2009 available at Microsoft's official website. To see click here What’s New in Microsoft Dynamics AX 2009 (Requires partnersource access).
Microsoft Dynamics AX 2009 is coming with many new features. Now you can use your .Net skills widely with Dynamics AX 2009.
Monday, April 7, 2008
How to use .Net Business Connector for Dynamics Ax 4.0 within .Net
NOTE: No warranties, use at your own risk.
Requirement :
1) Ax 4.0 with .Net Business Connector
2) Visual Studio 2005 (preferred)
Business Connector enables third-party applications to interface with Microsoft Dynamics AX as though they were a native Microsoft Dynamics AX client. Applications built using the Microsoft .NET Framework or ASP.NET can now interface with Microsoft Dynamics AX using the .NET Business Connector. The .NET Business Connector is integrated with Enterprise Portal and Web services. You can leverage the benefits of these other applications and services by installing the .NET Business Connector.
Open your visual studio.
Click on File>New>Project. New Project window will open. Select Visual C# from Project types and Windows Application from Templates. Give a name in the Name field and click on OK button.

By default Form1 will be added to your project.
From Toolbox add a button and a textbox to the form as shown below:

Double click on the button.
Now see the default code below:
using System;
using System.Collections.Generic;
using System.ComponentModel;
using System.Data;
using System.Drawing;
using System.Text;
using System.Windows.Forms;
namespace DotNet2Ax //your project name
{
public partial class Form1 : Form
{
public Form1()
{
InitializeComponent();
}
private void button1_Click(object sender, EventArgs e)
{
}
}
}
Click on menu Project >Add Reference…
It will give you the dialog as below:

Click on Browse tab and browse the Ax 4.0 Client folder then Bin and locate Microsoft.Dynamics.BusinessConnectorNet.dll as shown below:

Click OK button.
Now add the below lines in the button1_Click method.
Microsoft.Dynamics.BusinessConnectorNet.Axapta DAX = new Microsoft.Dynamics.BusinessConnectorNet.Axapta();
Microsoft.Dynamics.BusinessConnectorNet.AxaptaRecord DAXRec;
DAX.Logon(null, null, null, null);
DAXRec = DAX.CreateAxaptaRecord("CustTable");
DAXRec.ExecuteStmt("select firstonly * from %1");
textBox1.Text = (string) DAXRec.get_Field("name");
After adding the lines it will look like:
private void button1_Click(object sender, EventArgs e)
{
Microsoft.Dynamics.BusinessConnectorNet.Axapta DAX = new Microsoft.Dynamics.BusinessConnectorNet.Axapta();
Microsoft.Dynamics.BusinessConnectorNet.AxaptaRecord DAXRec;
DAX.Logon(null, null, null, null);
DAXRec = DAX.CreateAxaptaRecord("CustTable");
DAXRec.ExecuteStmt("select firstonly * from %1");
textBox1.Text = (string)DAXRec.get_Field("name");
}
Now click on Build>Build Solution.
Click on Debug>Start Debugging. Your Form1 will run. Click on the button and see the value of CustTable field ‘Name’.

Code Description:
DAX.Logon(null, null, null, null);
The above method takes logon criteriaon/parameters
Company, Language, ObjectServer, Configuration all are in string
DAXRec = DAX.CreateAxaptaRecord("CustTable");
In the above line table name has been specified.
DAXRec.ExecuteStmt("select firstonly * from %1");
In the above line select statement has been specified.
textBox1.Text = (string)DAXRec.get_Field("name");
In the above line selected record of field name is being assigned to the textBox control.
Thursday, April 3, 2008
How to use ActiveX in Dynamics Ax
Hi Guys,
Finally I got time to post an article for you.
Today I will show you how to use ActiveX in Dynamics Ax (Axapta)...
When creating an Axapta form, you can benefit from using ActiveX controls. An ActiveX control is a COM object that can be used as a graphical control inside an application.
The software available as ActiveX components spans from simple components such as check and combo boxes, to larger more complex components such as spreadsheets, calendars, Internet browsers, and communication programs.
In this article the screen shots I used of Ax 3.0.
I will tell you step by step as below:
You should have Microsoft Outlook installed on your system.
No warranties, use at your own risk.
1) Open your AOT and point to Forms.
2) Right click on Forms node and select New Form from the context menu as shown below
3) Rename the form to OutlookAccess
4) Expand the Form nodes and to Designs>Design
5) Right click on Design>New Control>ActiveX as shown below

ActiveX Browser will open. Select Microsoft Office Outlook View Control as shown below

6) Create two Groups on form Design. Drag and drop the ActiveX control to the first group and in the second group add a ButtonGroup control as shown below.
7) Now add two buttons to the ButtonGroup. Add Override method "clicked" to each of the button.
8) In the first button's clicked method write "activex.Open();" before super(); as shown below;

9) Write "activex.AddressBook();" in the second button's clicked method before super();

Now your form design looks like this

10) Save the form and run the form.
Hope it will help you a lot.
Subscribe to:
Posts (Atom)